Simple LCD Menu Main Page: Unterschied zwischen den Versionen
Mat (Diskussion | Beiträge) K (→Samples) |
Mat (Diskussion | Beiträge) K (→LCD Menu Designer) |
||
| (4 dazwischenliegende Versionen desselben Benutzers werden nicht angezeigt) | |||
| Zeile 11: | Zeile 11: | ||
Bit values can be set to On/Off (or another custom text), numerical values will be increased/decreased by the specified step size and string values can be edited using a custom set of characters (and two special characters for backspace/enter). Read-Only values just show the content of a variable. | Bit values can be set to On/Off (or another custom text), numerical values will be increased/decreased by the specified step size and string values can be edited using a custom set of characters (and two special characters for backspace/enter). Read-Only values just show the content of a variable. | ||
| + | |||
| + | Editable values could be preserved in EEPROM by option, stored values are loaded automatically in the init routine. | ||
To save program space, just the pieces of code you use are compiled. You get the smallest size if you just use Links and Function Calls, it will increase if you use values (read-only, editable or both) and for each data type used. | To save program space, just the pieces of code you use are compiled. You get the smallest size if you just use Links and Function Calls, it will increase if you use values (read-only, editable or both) and for each data type used. | ||
| Zeile 98: | Zeile 100: | ||
<pre>Declare Sub Menu_hide()</pre> | <pre>Declare Sub Menu_hide()</pre> | ||
hides the menu | hides the menu | ||
| + | |||
| + | |||
| + | <pre>Const Menu_eeprom_start = 1</pre> | ||
| + | Optional parameter for the EEPROM start address, default value is 1. To use another adress set the constant before the include directive: | ||
| + | <pre>... | ||
| + | Const Menu_eeprom_start = 123 | ||
| + | #include "menu.inc" | ||
| + | ...</pre> | ||
| + | |||
| + | |||
| + | <pre>Const Menu_eeprom_size = xxx</pre> | ||
| + | The size in bytes the menu uses in EEPROM to preserve values. This constant is defined in the menu data file. | ||
| + | |||
| + | |||
| + | <pre>Const Menu_eeprom_end = xxx</pre> | ||
| + | Points to the first unused memory location after the menu data in EEPROM (defined in menu.inc). | ||
== LCD Menu Designer == | == LCD Menu Designer == | ||
=== Global Settings === | === Global Settings === | ||
| − | [[File:Menu_designer_settings.jpg | + | [[File:Menu_designer_settings.jpg|Global menu settings]] |
When the first entry in the menu tree is selected, the global settings are visible. Here you can select the LCD character width, the visual style for the [[LCD Bargraph with different styles|bargraph]], edit the character table used in string edit mode and choose the texts to display for bit values (Default is On/Off, you can set it for example to Yes/No or High/Low etc.). | When the first entry in the menu tree is selected, the global settings are visible. Here you can select the LCD character width, the visual style for the [[LCD Bargraph with different styles|bargraph]], edit the character table used in string edit mode and choose the texts to display for bit values (Default is On/Off, you can set it for example to Yes/No or High/Low etc.). | ||
=== Link === | === Link === | ||
| − | [[File:Menu_designer_link.jpg | + | [[File:Menu_designer_link.jpg|Entry is a link, select the target]] |
With links you can jump to another entry in the menu, just select it in the right menu tree. | With links you can jump to another entry in the menu, just select it in the right menu tree. | ||
| Zeile 112: | Zeile 130: | ||
=== Value === | === Value === | ||
| − | [[File:Menu_designer_value.jpg | + | [[File:Menu_designer_value.jpg|Value settings]] |
Select the variable type (all Bascom types are supported) and choose if the value should be editable or read-only. | Select the variable type (all Bascom types are supported) and choose if the value should be editable or read-only. | ||
| Zeile 118: | Zeile 136: | ||
Then set the range of the value (lowest and highest possible value). | Then set the range of the value (lowest and highest possible value). | ||
If the value is editable, you further have to set its initial value (will be set in Menu_init) and, if its a numerical value, the step size (positive, > 0). | If the value is editable, you further have to set its initial value (will be set in Menu_init) and, if its a numerical value, the step size (positive, > 0). | ||
| + | Editable values could also be preserved in EEPROM. On startup, values stored in EEPROM are loaded to the linked variables. If no values have been saved before/data is not valid (ex. the menu structure changes), they will be set to the initial value. When exiting the edit mode, the updated value is stored in EEPROM for the next startup. | ||
=== Function === | === Function === | ||
| − | [[File:Menu_designer_function.jpg | + | [[File:Menu_designer_function.jpg|Function ID select]] |
Select a function ID between 2 and 255. When this entry is selected, the menu hides and the Menu()-function returns the ID. | Select a function ID between 2 and 255. When this entry is selected, the menu hides and the Menu()-function returns the ID. | ||
=== Tool: Character Table === | === Tool: Character Table === | ||
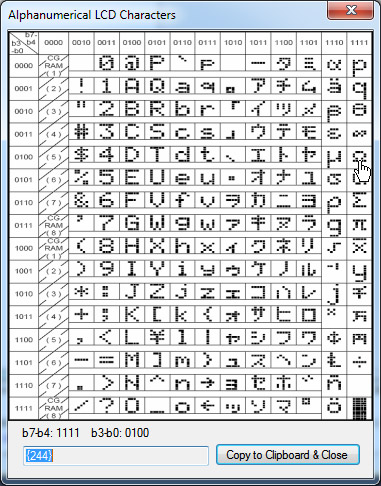
| − | [[File:Menu_designer_character_table.jpg | + | [[File:Menu_designer_character_table.jpg|Tool: interactive LCD character table]] |
With this little tool it is easy to get the corresponding code for characters supported by alphanumerical LCDs. | With this little tool it is easy to get the corresponding code for characters supported by alphanumerical LCDs. | ||
| Zeile 132: | Zeile 151: | ||
== Samples == | == Samples == | ||
=== Sample 1: Small menu === | === Sample 1: Small menu === | ||
| + | Bare sample with minimal functions | ||
[[LCD Menu Sample 1]] | [[LCD Menu Sample 1]] | ||
=== Sample 2: All functions === | === Sample 2: All functions === | ||
| + | Complete sample demonstrating all functions of the menu | ||
[[LCD Menu Sample 2]] | [[LCD Menu Sample 2]] | ||
| Zeile 140: | Zeile 161: | ||
Uses the same menu as in [[LCD Menu Sample 2]], but is optimized for use in the simulator, button events are generated using the serial connection. | Uses the same menu as in [[LCD Menu Sample 2]], but is optimized for use in the simulator, button events are generated using the serial connection. | ||
| − | == | + | === Sample 4: All functions, Arduino M2560 + LCD Keyboard Shield === |
| − | + | Uses the same menu as in [[LCD Menu Sample 2]], runs on off-the-shelf hardware Arduino M2560 and the LCD Keyboard shield. | |
| − | |||
| − | [[ | ||
== Download == | == Download == | ||
| + | * [http://www.braunecker.at/downloads/lcd_menu/setup_lcd_menu_1_5.exe LCD Menu Version 1.5] | ||
| + | |||
| + | To install the Menu Designer, run setup_lcd_menu_*_*.exe with administrator privileges. | ||
| + | |||
| + | |||
| + | old Versions: | ||
* [http://www.braunecker.at/downloads/lcd_menu/setup_lcd_menu_1_4.exe LCD Menu Version 1.4] | * [http://www.braunecker.at/downloads/lcd_menu/setup_lcd_menu_1_4.exe LCD Menu Version 1.4] | ||
| − | |||
== Changelog == | == Changelog == | ||
| + | === Version 1.5 (21.11.2017) === | ||
| + | Enhancements: | ||
| + | * Added option to preserve editable values in EEPROM | ||
| + | * Changed file extensions from .bas to .inc | ||
| + | * Added menu entry move up/down buttons | ||
| + | Bug fixes: | ||
| + | * Exported wrong count of values of type Long | ||
| + | * Exported wrong data for Dword data types | ||
| + | * Minor bug fixes | ||
| + | |||
=== Version 1.4 (21.05.2014) === | === Version 1.4 (21.05.2014) === | ||
Enhancements: | Enhancements: | ||
Aktuelle Version vom 17. Februar 2019, 11:56 Uhr
Inhaltsverzeichnis
Overview
This is a menu system for standard alphanumerical LC-displays.
To navigate through the menu, only 3 buttons are needed: Forward, Backward and Menu/Enter (or a rotary encoder with push button).
You can make multiple nested sub-menus, hidden menus (not supported by the designer yet), function calls and display or edit different value types (Bit, Byte, Word, Integer, DWord, Long, Single, Double, String).
The menu structure and associated data is stored in arrays at runtime, the structure is made by connecting the right entries together (with their array indexes).
Numerical values are displayed both as value and as a bargraph showing the current position in the specified range.
Bit values can be set to On/Off (or another custom text), numerical values will be increased/decreased by the specified step size and string values can be edited using a custom set of characters (and two special characters for backspace/enter). Read-Only values just show the content of a variable.
Editable values could be preserved in EEPROM by option, stored values are loaded automatically in the init routine.
To save program space, just the pieces of code you use are compiled. You get the smallest size if you just use Links and Function Calls, it will increase if you use values (read-only, editable or both) and for each data type used.
Video Demo
Watch this video to see it in action.
How to use it
Setup
Include the menu structure created with the designer and the menu functions:
Macro Menu_include_data
   $include "inc\menu_data.bas"
End Macro
$include "inc\menu.bas"
Dimension used Variables
Between the function include and the initialisation you have to dimension the variables used to display or edit in the menu:
Dim Test_bit As Byte
Dim Test_byte As Byte
Dim Test_word As Word
Dim Test_integer As Integer
Dim Test_dword As Dword
Dim Test_long As Long
Dim Test_single As Single
Dim Test_double As Double
Dim Test_string As String * Menu_value_string_width
Bit data types have to be defined as a byte. Note that a constant was created containing the maximum string size.
Initialisation
Menu_init
Main Loop
Do
   If Switch_minus = 1 Then Menu_backward()            ' back button pressed
   If Switch_plus = 1 Then Menu_forward()              ' forward button pressed
   If Switch_enter = 1 Then                            ' enter button pressed
      Select Case Menu_enter()
      Case Menu_exit:                                  ' Exit entry selected
         ...
      Case 2-255:                                      ' Function call
         ...
      End Select
   End If
   Menu                                                ' Main function
   ...
Loop
Interface description
Const Menu_default_entry
ID of the default entry
Const Menu_value_string_width
size for strings used to display
Macro Menu_init
loads the menu data
Macro Menu_check_update
call this macro in the time interval you wish to update read-only values
Declare Sub Menu()
Main function, called in Main Loop
Declare Sub Menu_forward()
Goes one step forward in the menu or while in edit mode, bit values are set to true, numerical values are increased by the step size and for strings, the following character in the table will be selected.
Declare Sub Menu_backward()
Goes one step backward in the menu or while in edit mode, bit values are set to false, numerical values are decreased by the step size and for strings, the preceeding character in the table will be selected.
Declare Function Menu_enter() As Byte
Shows the menu if inactive, follows a link, enters/exits the edit mode, adds a character in string edit mode or selects a function
Declare Sub Menu_show(byval Entry_id As Byte)
Displays the menu with the provided entry id, if 0, the default entry is selected
Declare Sub Menu_hide()
hides the menu
Const Menu_eeprom_start = 1
Optional parameter for the EEPROM start address, default value is 1. To use another adress set the constant before the include directive:
...
Const Menu_eeprom_start = 123
#include "menu.inc"
...
Const Menu_eeprom_size = xxx
The size in bytes the menu uses in EEPROM to preserve values. This constant is defined in the menu data file.
Const Menu_eeprom_end = xxx
Points to the first unused memory location after the menu data in EEPROM (defined in menu.inc).
LCD Menu Designer
Global Settings
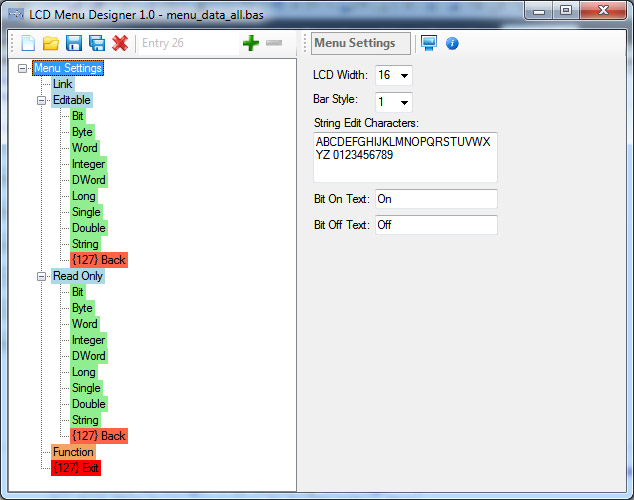
When the first entry in the menu tree is selected, the global settings are visible. Here you can select the LCD character width, the visual style for the bargraph, edit the character table used in string edit mode and choose the texts to display for bit values (Default is On/Off, you can set it for example to Yes/No or High/Low etc.).
Link
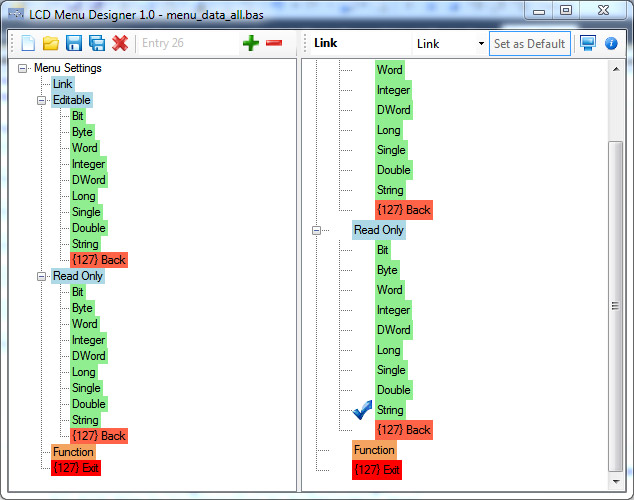
With links you can jump to another entry in the menu, just select it in the right menu tree. Submenu- and Back entries are also links, but the target is created automatically.
Value
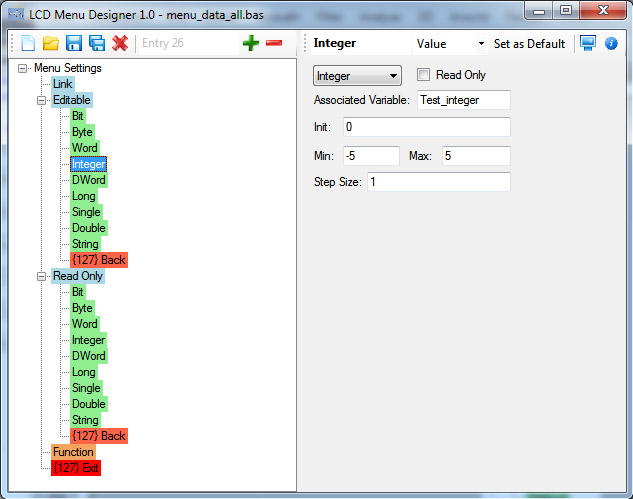
Select the variable type (all Bascom types are supported) and choose if the value should be editable or read-only. In the "Associated variable" field enter the Variable name you declared in your code. Then set the range of the value (lowest and highest possible value). If the value is editable, you further have to set its initial value (will be set in Menu_init) and, if its a numerical value, the step size (positive, > 0). Editable values could also be preserved in EEPROM. On startup, values stored in EEPROM are loaded to the linked variables. If no values have been saved before/data is not valid (ex. the menu structure changes), they will be set to the initial value. When exiting the edit mode, the updated value is stored in EEPROM for the next startup.
Function
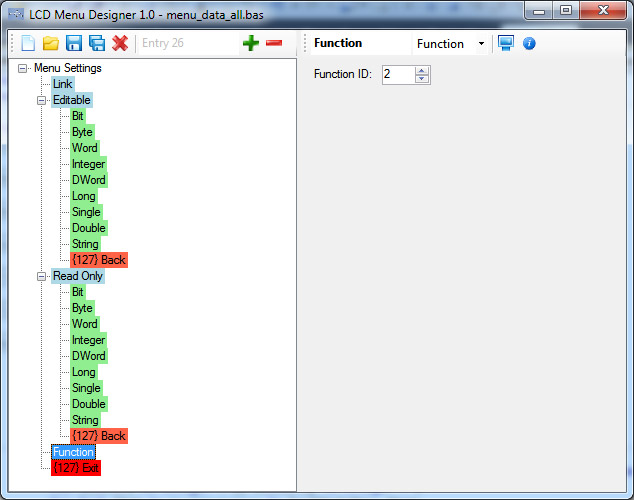
Select a function ID between 2 and 255. When this entry is selected, the menu hides and the Menu()-function returns the ID.
Tool: Character Table
With this little tool it is easy to get the corresponding code for characters supported by alphanumerical LCDs. Click on the desired character, the calculated code, formatted ready to use in Bascom strings, appears in the text field below.
Samples
Bare sample with minimal functions LCD Menu Sample 1
Sample 2: All functions
Complete sample demonstrating all functions of the menu LCD Menu Sample 2
Sample 3: All functions, simulation
Uses the same menu as in LCD Menu Sample 2, but is optimized for use in the simulator, button events are generated using the serial connection.
Sample 4: All functions, Arduino M2560 + LCD Keyboard Shield
Uses the same menu as in LCD Menu Sample 2, runs on off-the-shelf hardware Arduino M2560 and the LCD Keyboard shield.
Download
To install the Menu Designer, run setup_lcd_menu_*_*.exe with administrator privileges.
old Versions:
Changelog
Version 1.5 (21.11.2017)
Enhancements:
- Added option to preserve editable values in EEPROM
- Changed file extensions from .bas to .inc
- Added menu entry move up/down buttons
Bug fixes:
- Exported wrong count of values of type Long
- Exported wrong data for Dword data types
- Minor bug fixes
Version 1.4 (21.05.2014)
Enhancements:
- Menu Tree Drag and Drop function
- Automatic Check & File copy of Bascom sources in the data file location
- Toolbar button to locate the Bascom source files
Bug fixes:
- Save function stopped saving the embedded Menu Designer data
- Update Component was broken, so you have to manually download & install V.1.4, sorry for that
- It was possible to enter longer strings than the max string length, following memory was overwritten
- R23 is used in the timer ISR, but was not saved
Version 1.3 (11.08.2013)
- in some constellations, the designer gave false child IDs to value entries.
- the read-only state of bit variables was taken from their start value
- minor bug fixes
Version 1.2 (07.12.2011)
- fixed a major bug when using Function-entries
- LCD width was set to 0 if the default value was changed
- new setup routine
- automatic updates (searches on startup, shows a notification if a new version is available and installs it)
