LCD Menu Hauptseite: Unterschied zwischen den Versionen
Mat (Diskussion | Beiträge) K (Created page with "== Übersicht == Das ist ein Menü-System für alphanumerische Standard-LCDs mit mindestens 2 Zeilen. Um durch das Menü zu navigieren benötigt man nur 3 Tasten (+, -, Enter) o...") |
Mat (Diskussion | Beiträge) K (→How to use it) |
||
| Zeile 18: | Zeile 18: | ||
In diesem [http://www.vimeo.com/25921689 Video] ist das Menü in Aktion zu sehen. | In diesem [http://www.vimeo.com/25921689 Video] ist das Menü in Aktion zu sehen. | ||
| − | == | + | == Einbinden ins Programm == |
=== Setup === | === Setup === | ||
| − | + | Die vom Designer erstellten Daten und die Funktionen fürs Menü inkludieren: | |
<pre>Macro Menu_include_data | <pre>Macro Menu_include_data | ||
$include "inc\menu_data.bas" | $include "inc\menu_data.bas" | ||
| Zeile 26: | Zeile 26: | ||
$include "inc\menu.bas"</pre> | $include "inc\menu.bas"</pre> | ||
| − | === | + | === Dimensionierung der Variablen === |
| − | + | Zwischen dem Include und dem Aufruf der Init-Funktion müssen die Variablen (die im Menü angezeigt oder editiert werden) dimensioniert werden. | |
<pre>Dim Test_bit As Byte | <pre>Dim Test_bit As Byte | ||
Dim Test_byte As Byte | Dim Test_byte As Byte | ||
| Zeile 37: | Zeile 37: | ||
Dim Test_double As Double | Dim Test_double As Double | ||
Dim Test_string As String * Menu_value_string_width</pre> | Dim Test_string As String * Menu_value_string_width</pre> | ||
| − | Bit | + | Bit Datentypen müssen als Byte deklariert werden. |
| − | + | Außerdem wird eine Konstante erstellt, die die maximale Länge für Strings angibt. | |
=== Initialisation === | === Initialisation === | ||
| Zeile 58: | Zeile 58: | ||
... | ... | ||
Loop</pre> | Loop</pre> | ||
| − | |||
== Interface description == | == Interface description == | ||
Version vom 11. Juli 2011, 18:55 Uhr
Inhaltsverzeichnis
Übersicht
Das ist ein Menü-System für alphanumerische Standard-LCDs mit mindestens 2 Zeilen.
Um durch das Menü zu navigieren benötigt man nur 3 Tasten (+, -, Enter) oder einen Drehencoder mit eingebautem Taster.
Die Menü-Struktur kann beliebig tief verschachtelt sein, versteckte Sub-Menüs sind möglich (aber noch nicht vom Designer unterstützt). Weiters kann man durch einen Menüeintrag eine beliebige Funktion ausführen oder Variableninhalte anzeigen und editieren (Alle Bascom-Typen werden unterstützt).
Die Menü-Struktur und damit verknüpfte Daten werden aus dem Flash geladen zur Laufzeit in Arrays verwaltet, die Menüpunkte werden mithilfe ihrer Indexes verknüpft.
Numerische Variableninhalte werden gleichzeitig als Zahl und grafisch mit einem Bargraph, welcher die momentane Position innerhalb des spezifizierten Intervalls darstellt, angezeigt.
Bit Variablen können auf On/Off (oder einen anderen beliebigen Text) gesetzt werden, numerische Werte werden mit der eingestellten Schrittgröße in- oder dekrementiert und Strings können mithilfe einer wählbaren Zeichentabelle (und 2 Spezialzeichen zum Löschen/Bestätigen) editiert werden.
Um Flash-Speicher zu sparen werden nur benötigte Code-Teile kompiliert. Am wenigsten Speicherplatz wird benötigt, wenn nur Links und Funktionen verwendet werden. Der Speicherverbrauch steigt jeweils mit der Verwendung von Read-Only Werten, editierbaren Werten oder beiden und zusätzlich für jeden im Menü verwendeten Datentyp.
Video Demo
In diesem Video ist das Menü in Aktion zu sehen.
Einbinden ins Programm
Setup
Die vom Designer erstellten Daten und die Funktionen fürs Menü inkludieren:
Macro Menu_include_data
   $include "inc\menu_data.bas"
End Macro
$include "inc\menu.bas"
Dimensionierung der Variablen
Zwischen dem Include und dem Aufruf der Init-Funktion müssen die Variablen (die im Menü angezeigt oder editiert werden) dimensioniert werden.
Dim Test_bit As Byte
Dim Test_byte As Byte
Dim Test_word As Word
Dim Test_integer As Integer
Dim Test_dword As Dword
Dim Test_long As Long
Dim Test_single As Single
Dim Test_double As Double
Dim Test_string As String * Menu_value_string_width
Bit Datentypen müssen als Byte deklariert werden. Außerdem wird eine Konstante erstellt, die die maximale Länge für Strings angibt.
Initialisation
Menu_init
Main Loop
Do
   If Switch_minus = 1 Then Menu_backward()            ' back button pressed
   If Switch_plus = 1 Then Menu_forward()              ' forward button pressed
   If Switch_enter = 1 Then                            ' enter button pressed
      Select Case Menu_enter()
      Case Menu_exit:                                  ' Exit entry selected
         ...
      Case 2-255:                                      ' Function call
         ...
      End Select
   End If
   Menu                                                ' Main function
   ...
Loop
Interface description
Const Menu_default_entry
ID of the default entry
Const Menu_value_string_width
size for strings used to display
Macro Menu_init
loads the menu data
Macro Menu_check_update
call this macro in the time interval you wish to update read-only values
Declare Sub Menu()
Main function, called in Main Loop
Declare Sub Menu_forward()
Goes one step forward in the menu or while in edit mode, bit values are set to true, numerical values are increased by the step size and for strings, the following character in the table will be selected.
Declare Sub Menu_backward()
Goes one step backward in the menu or while in edit mode, bit values are set to false, numerical values are decreased by the step size and for strings, the preceeding character in the table will be selected.
Declare Function Menu_enter() As Byte
Shows the menu if inactive, follows a link, enters/exits the edit mode, adds a character in string edit mode or selects a function
Declare Sub Menu_show(byval Entry_id As Byte)
Displays the menu with the provided entry id, if 0, the default entry is selected
Declare Sub Menu_hide()
hides the menu
LCD Menu Designer
Global Settings
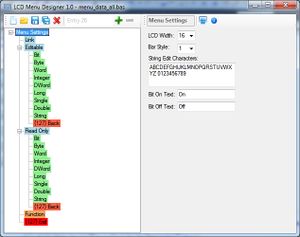
When the first entry in the menu tree is selected, the global settings are visible. Here you can select the LCD character width, the visual style for the bargraph, edit the character table used in string edit mode and choose the texts to display for bit values (Default is On/Off, you can set it for example to Yes/No or High/Low etc.).
Link
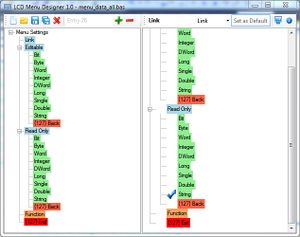
With links you can jump to another entry in the menu, just select it in the right menu tree. Submenu- and Back entries are also links, but the target is created automatically.
Value
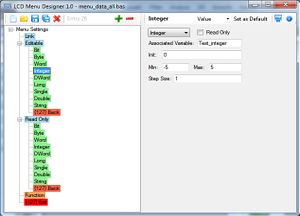
Select the variable type (all Bascom types are supported) and choose if the value should be editable or read-only. In the "Associated variable" field enter the Variable name you declared in your code. Then set the range of the value (lowest and highest possible value). If the value is editable, you further have to set its initial value (will be set in Menu_init) and, if its a numerical value, the step size (positive, > 0).
Function
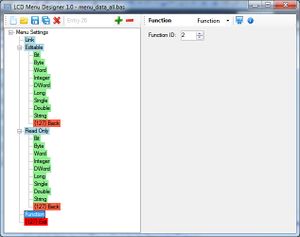
Select a function ID between 2 and 255. When this entry is selected, the menu hides and the Menu()-function returns the ID.
Tool: Character Table
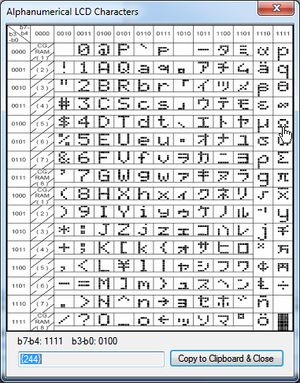
With this little tool it is easy to get the corresponding code for characters supported by alphanumerical LCDs. Click on the desired character, the calculated code, formatted ready to use in Bascom strings, appears in the text field below.
Samples
Sample 2: All functions
Donate
This Software is Donationware. <paypal>1</paypal> See here for more informations
Download
To install the Menu Designer, run setup.exe with administrator privileges.
